A customer lands on your product page, has a question, and somewhere between looking for a contact form and not finding one, they leave. That's the version of the story that doesn't end in a sale.
The fix - a WhatsApp button right there on the product page - takes less than 20 minutes to set up on WooCommerce. No code, no developer, no theme editing. Just a plugin and a few settings that are worth getting right the first time.
Sort Out Your WhatsApp Number Format Before Anything Else
Every WhatsApp plugin generates what's called a wa.me link - a direct URL that opens a chat with a specific number. The format that link requires is your full international phone number: country code first, then the number itself, no plus sign, no spaces, no dashes, no parentheses. Just digits.
A Brazilian number written as (11) 91234-5678 becomes 5511912345678. A UK number written as +44 7700 900123 becomes 447700900123. The reason this matters upfront: most plugins will accept a wrongly formatted number without any error, display the button fine, and silently open a chat with a number that doesn't exist. Plenty of store owners have gone weeks with a non-functional button for exactly this reason.
Once you have the number in the right format, verify it before going any further. Open a browser tab, go to https://wa.me/YOURNUMBER with your actual number. If it opens a WhatsApp chat with your account, the format is right.
Personal Account, WhatsApp Business, or the API - Which One to Use
If you're currently using a personal WhatsApp number for your store, it works for receiving messages but has one visible downside: customers who tap your button see whatever name is saved in your personal profile - which reads as someone's private account, not a business.
WhatsApp Business is free to download, lets you set a proper business name and description, and supports automated away messages when you're offline. For a no-code button on a product page, it's the right setup for most stores.
The WhatsApp Business API is a different tier - built for high-volume messaging and CRM integration, requiring a Meta-approved platform to access. If you're starting from scratch, the standard WhatsApp Business app is where to begin.
Picking a Plugin

There are roughly a dozen WordPress plugins that can put a WhatsApp button on a WooCommerce product page. The differences that show up in day-to-day use are: whether the pre-filled message can pull in live product data, how much control you have over button placement, and how far the integration goes beyond just placing a button.
ChatCart Pro goes further than a button. When a customer taps it on the product page - or cart, mini-cart, or checkout - the plugin creates a real WooCommerce order in the background and opens WhatsApp with a fully formatted summary: product name, variations (size, color), shipping method and cost, delivery address, payment method, and order total. The customer sends that message and the sale is effectively done. It also includes a floating button with configurable position and page-level controls, a custom checkout form manager with drag-and-drop fields and input masks for CPF, CNPJ, SSN, and other regional formats, per-category number routing, and a built-in analytics dashboard that tracks clicks by button type, product, and page. Available at veloryntech.com/chatcartpro for a one-time $69.
Click to Chat is the most widely installed standalone WhatsApp button plugin - over 200,000 active installs on WordPress.org. The free version handles the basics: a configurable button on product pages, dynamic pre-filled messages that pull in the product name and URL, and five placement positions relative to the add-to-cart area. For stores that want a button without the full checkout replacement flow, the free version is enough for most setups.
OneClick Chat to Order is free and built around a similar order-through-WhatsApp model to ChatCart Pro, though without the automatic background order creation or the analytics layer. Worth considering as a lightweight free alternative if the full ChatCart Pro feature set is more than your store needs right now.
The step-by-step walkthrough below uses Click to Chat - it's the most commonly encountered free option and the configuration logic carries over to any of the others.
Installation
From your WordPress dashboard, go to Plugins → Add New Plugin. Search "Click to Chat." The one you want is published by HoliThemes - green icon, several hundred thousand installs. Hit Install Now, then Activate. A Click to Chat item will appear in your left sidebar.
The Settings That Actually Matter
Your Phone Number
First field in the plugin settings. Enter your number in the international format you verified earlier - digits only, no formatting. Save the settings, then use the wa.me test again to confirm it's routing correctly.
The Pre-Filled Message
Most stores either leave this blank or put something like "Hello." Both are worse than using the product name. When a customer taps the button and sees an empty message field, a percentage close the window rather than type their own opening line.
Click to Chat supports dynamic variables that pull live product data into the message. The one worth using is {title}, which inserts the current product name. A message written as:
Hi, I have a question about {title} - can you help?
...becomes "Hi, I have a question about Merino Pullover - can you help?" for a customer on that product's page. They tap send without typing anything. Other available variables: {url} inserts the product page URL, {sku} inserts the product SKU, {price} inserts the current price.
Where the Button Appears on the Product Page
Click to Chat's WooCommerce options let you place the button in five positions relative to the product layout. "After add to cart form" is the most consistently placed option across different themes and a reliable default if you're unsure where to start.
If the button lands somewhere unexpected, it's usually a theme hook issue. Switching to "After add to cart form" resolves most of these because it uses the most universally implemented WooCommerce hook.
Button Appearance
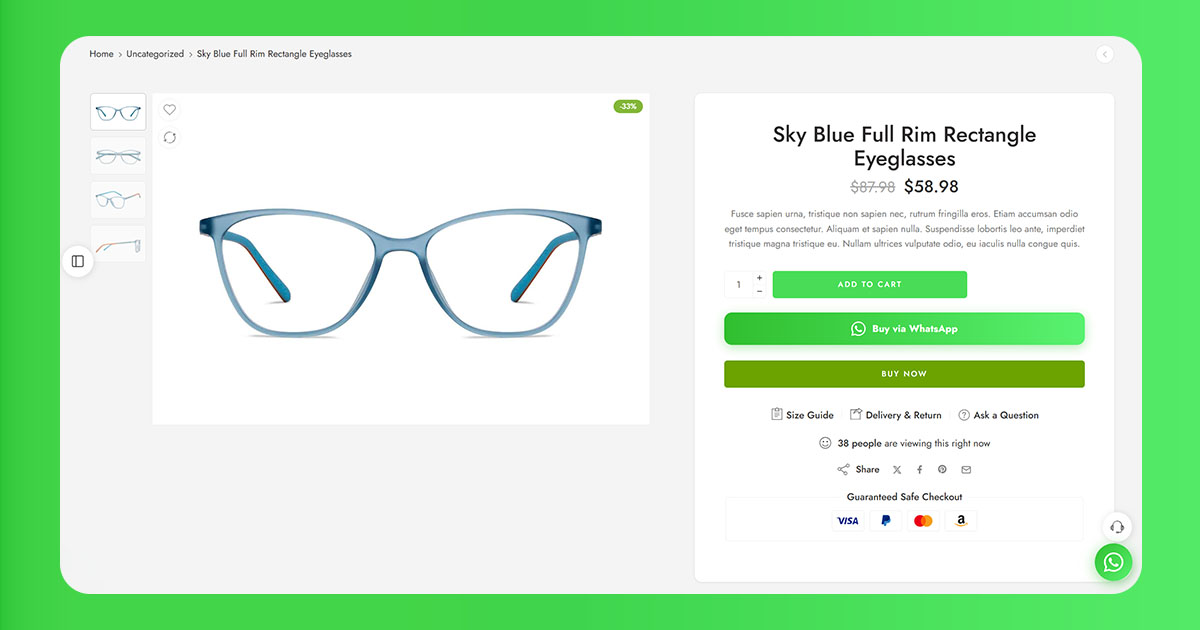
A label like "Chat on WhatsApp" or "Ask on WhatsApp" performs better than just "WhatsApp" as a standalone label - the action word tells the customer what will happen. WhatsApp's green (#25D366) is immediately recognizable, which is a real advantage - customers know what the button does before they read the label.
Test It Properly Before Leaving It Live
Go to a product page, tap the button, and check four things: the chat opens to your actual number, the pre-filled message shows the right product name, the message goes through to the correct WhatsApp account, and the button doesn't look broken on a phone screen. Do this on mobile - the layout on a small screen is where issues tend to appear first.
The Floating Button - a Separate Decision
Click to Chat also offers a floating button: a sticky WhatsApp icon pinned to the corner of every page as the customer scrolls. It's configured separately from the product page button.
Whether to use it depends heavily on who your customers are. In Brazil, India, and most of the Middle East, a floating button reads as normal and expected. In the US and UK, where WhatsApp has much lower penetration as a business contact channel, it often goes ignored on desktop and can make the site feel cluttered. If you do turn it on, restrict it to product pages and checkout - a floating button on a blog post is just noise.
Going deeper on floating buttons: The Floating WhatsApp Button: Does It Actually Increase Store Inquiries? - what the UX research says about when the button works and when it creates friction.
A Few Things That Come Up After It's Live
Response time matters more than most people expect. A customer who sends a WhatsApp message from your product page is usually still on the page, or still thinking about the product. A reply that comes back in two or three minutes frequently ends in a sale. One that arrives six hours later is talking to someone who has moved on. If the person managing WhatsApp can't respond quickly during business hours, set an automated greeting that tells customers when to expect a reply - WhatsApp Business supports this natively under Business Tools → Away Message.
Watch what people actually ask. The questions that come through are a real-time report on what your product pages aren't communicating clearly. If the same sizing question comes in three times in a week, the product page needs better sizing information. The button generates sales conversations and feedback at the same time.
If You're Running Multiple Product Lines or Have a Team
Everything described above routes all product page inquiries to a single WhatsApp number. For a solo operator or a small team sharing one number, that works fine. If your store has genuinely separate departments - different product categories handled by different people - routing everything to one number creates sorting overhead that adds up quickly.
ChatCart Pro handles per-category number routing natively through its Number Routing tab, alongside the full order creation and analytics features described above. The one-time pricing makes it one of the most cost-effective complete solutions available.
Related: Multi-Number WhatsApp Routing for WooCommerce Stores With Multiple Product Lines - the full setup guide for routing inquiries to different teams or departments.
Want the most complete WhatsApp integration for WooCommerce? ChatCart Pro creates real WooCommerce orders automatically when customers tap the button, includes per-category routing, analytics, and a custom checkout form - all for a one-time payment.
Common Things That Go Wrong
Button visible but chat opens to wrong or invalid number: Number format. Go to plugin settings, delete the current entry, retype as nothing but digits: country code + local number, no plus, no spaces, no dashes. Use the wa.me link test to confirm before saving.
Button doesn't appear on product pages: Check that the WooCommerce product page toggle is enabled under Click to Chat → WooCommerce - this is a separate toggle from the general floating button. If enabled and nothing shows, try switching position to "After add to cart form" and clearing any caching plugins.
Variable name shows in message instead of product name: The syntax must be {title} - curly braces, all lowercase, no spaces inside. Any other variation won't parse correctly.